Prince Draperies and Curtains, Logo
Phone Icon (866) 671-8455


How to Measure

In order to help you with your selection, we have created a "how to measure" section below.

Measuring Tips

• Use a metal measuring tape (flexible cloth tapes are not as accurate, as they may stretch).
• Record measurements clearly. Indicate which measurement is the width, and which is the height. It’s a common mistake to switch the two measurements.
• Be precise. Round measurements to the nearest one-eighth (1/8) of an inch.
• Measure for width in three different places: at the top, the middle, and the bottom of the window. For an inside mount, use the shortest width. For an outside mount, consider how far you’d like the treatment to extend beyond the window frame on each side.
• Measure for length in three different places: from the top right, top left, and top center of the window to the desired length. Use the longest measurement, except when measuring for vertical blinds.
• Don’t be surprised if your window is out-of-square. It probably isn’t noticeable if it is off a little. However, if there is a considerable difference, you may want to use an outside mount to hide the imperfection.
• Printable worksheets are available to help guide you through the process, while providing a place to note measurements. Look forprint my measurement worksheet within the measuring directions for the type of window treatment you’d like to purchase.

Curtains


Note: The headrail protects the mechanism that raises and lowers the blind or shade.For inside mount installation:
Width: Measure (A) where headrail or roller will be installed.
Length: Measure (B) from top on inside casing to windowsill.

Before ordering, see product depth information below.For outside mount installation:
Width: Measure (C) where headrail will be installed. For horizontal blinds and pleated shades, the headrail must overlap window 1 1/2 inch or more on each side; for Roman and roll up shades allow at least 2 inches on each side.
Length: Measure (D) where top of headrail will be installed to the windowsill or floor.

Patio door horizontal blinds include two separate headrails and are always mounted outside the window casing.


Product Depth for
Horizontal Blinds, Pleated,
Roll Up, Cellular, and Roman Shades

For inside mounts:

Product depth refers to how far your blind or shade’s headrail will project out from the mounting surface when inside mounted. This is useful to know if you are mounting your blind or shade under another treatment like a cornice or panels and, it gives a neat, finished appearance to your window.

Check the table below to verify that your window opening is deep enough to fit the blind or shade you’ve chosen. The table lists two depths: the minimum needed for an inside mount, and the minimum needed to flush mount your blind or shade (i.e. fully recess it in the window so it will not project out of the opening).

Inside Mount Chart


Measuring for Vertical Blinds

Outside mount installation only: A headrail is installed and vanes are attached.
Width: Measure (A) where headrail will be installed. Headrail must overlap window or door opening at least 3 inches on each side for proper stacking of vanes when blinds are open.
Length: Measure (B) where top of headrail will be installed to the windowsill or floor.


Measuring for Cut-to-Width Roller Shades

These shades are cut-to-width and shipped directly from our distribution centers.

Roller shades have slightly larger light gaps on the sides than other products. If you need maximum light control and privacy, consider an outside mount.

To order, please include:

• Catalog Number
• Exact width (see measuring instructions below)
• Color code and name

To replace old shades that fit:
Measure old roller from end to end, including metal tips. Order that width.
For new shades:
Decide if you will install shade inside or outside window casing.
Please note:
The roller for shades is held in place by brackets and the shade fabric is 1/2 to 1 inch narrower than the roller.
For inside mount installation:
Width: Measure (A) where brackets will be installed and subtract 1/8 inch from total measurement and order that width. Measure each window separately—widths may vary slightly.
Length: Measure (B) from top of inside casing to windowsill. (Shades fit windows up to 66 inches long.)

For outside mount installation:
Width: Measure (C) where brackets will be installed. Shade should overlap window at least 1 1/2 inches on each side for maximum light control. 
Length: Measure (D) from top of casing to windowsill. (Shades fit windows up to 66 inches long.)


Measuring for Curtains & Draperies

Determine Rod Width
Center-draw draperies:
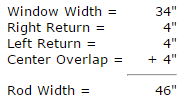
Measure the window width (A). If you already own the traverse rod you intend to use, measure the rod return (the measurement from the face of the rod to the wall). If you don’t already have a traverse rod, consider the return to be 4 inches for measuring purposes.

To determine width:
Add window width, right and left returns, and a 4 inches for overlap at the center. If you intend to open and close your draperies for privacy and/or light control, the rod should be approximately 15% wider than the window. This will allow the draperies to stackback against the wall and leave space for panels to clear glass when open.

For one-way-draw draperies:
Add rod return for just one side, plus 1 inch for drapery to extend past the rod.Total of rod width, returns, and overlap is your total Rod Width. Example:
Determine Curtain/Drapery Width

Determine Curtain/Drapery Width
Once you have determined total Rod Width, use the chart below to determine the proper Drapery Width to order.